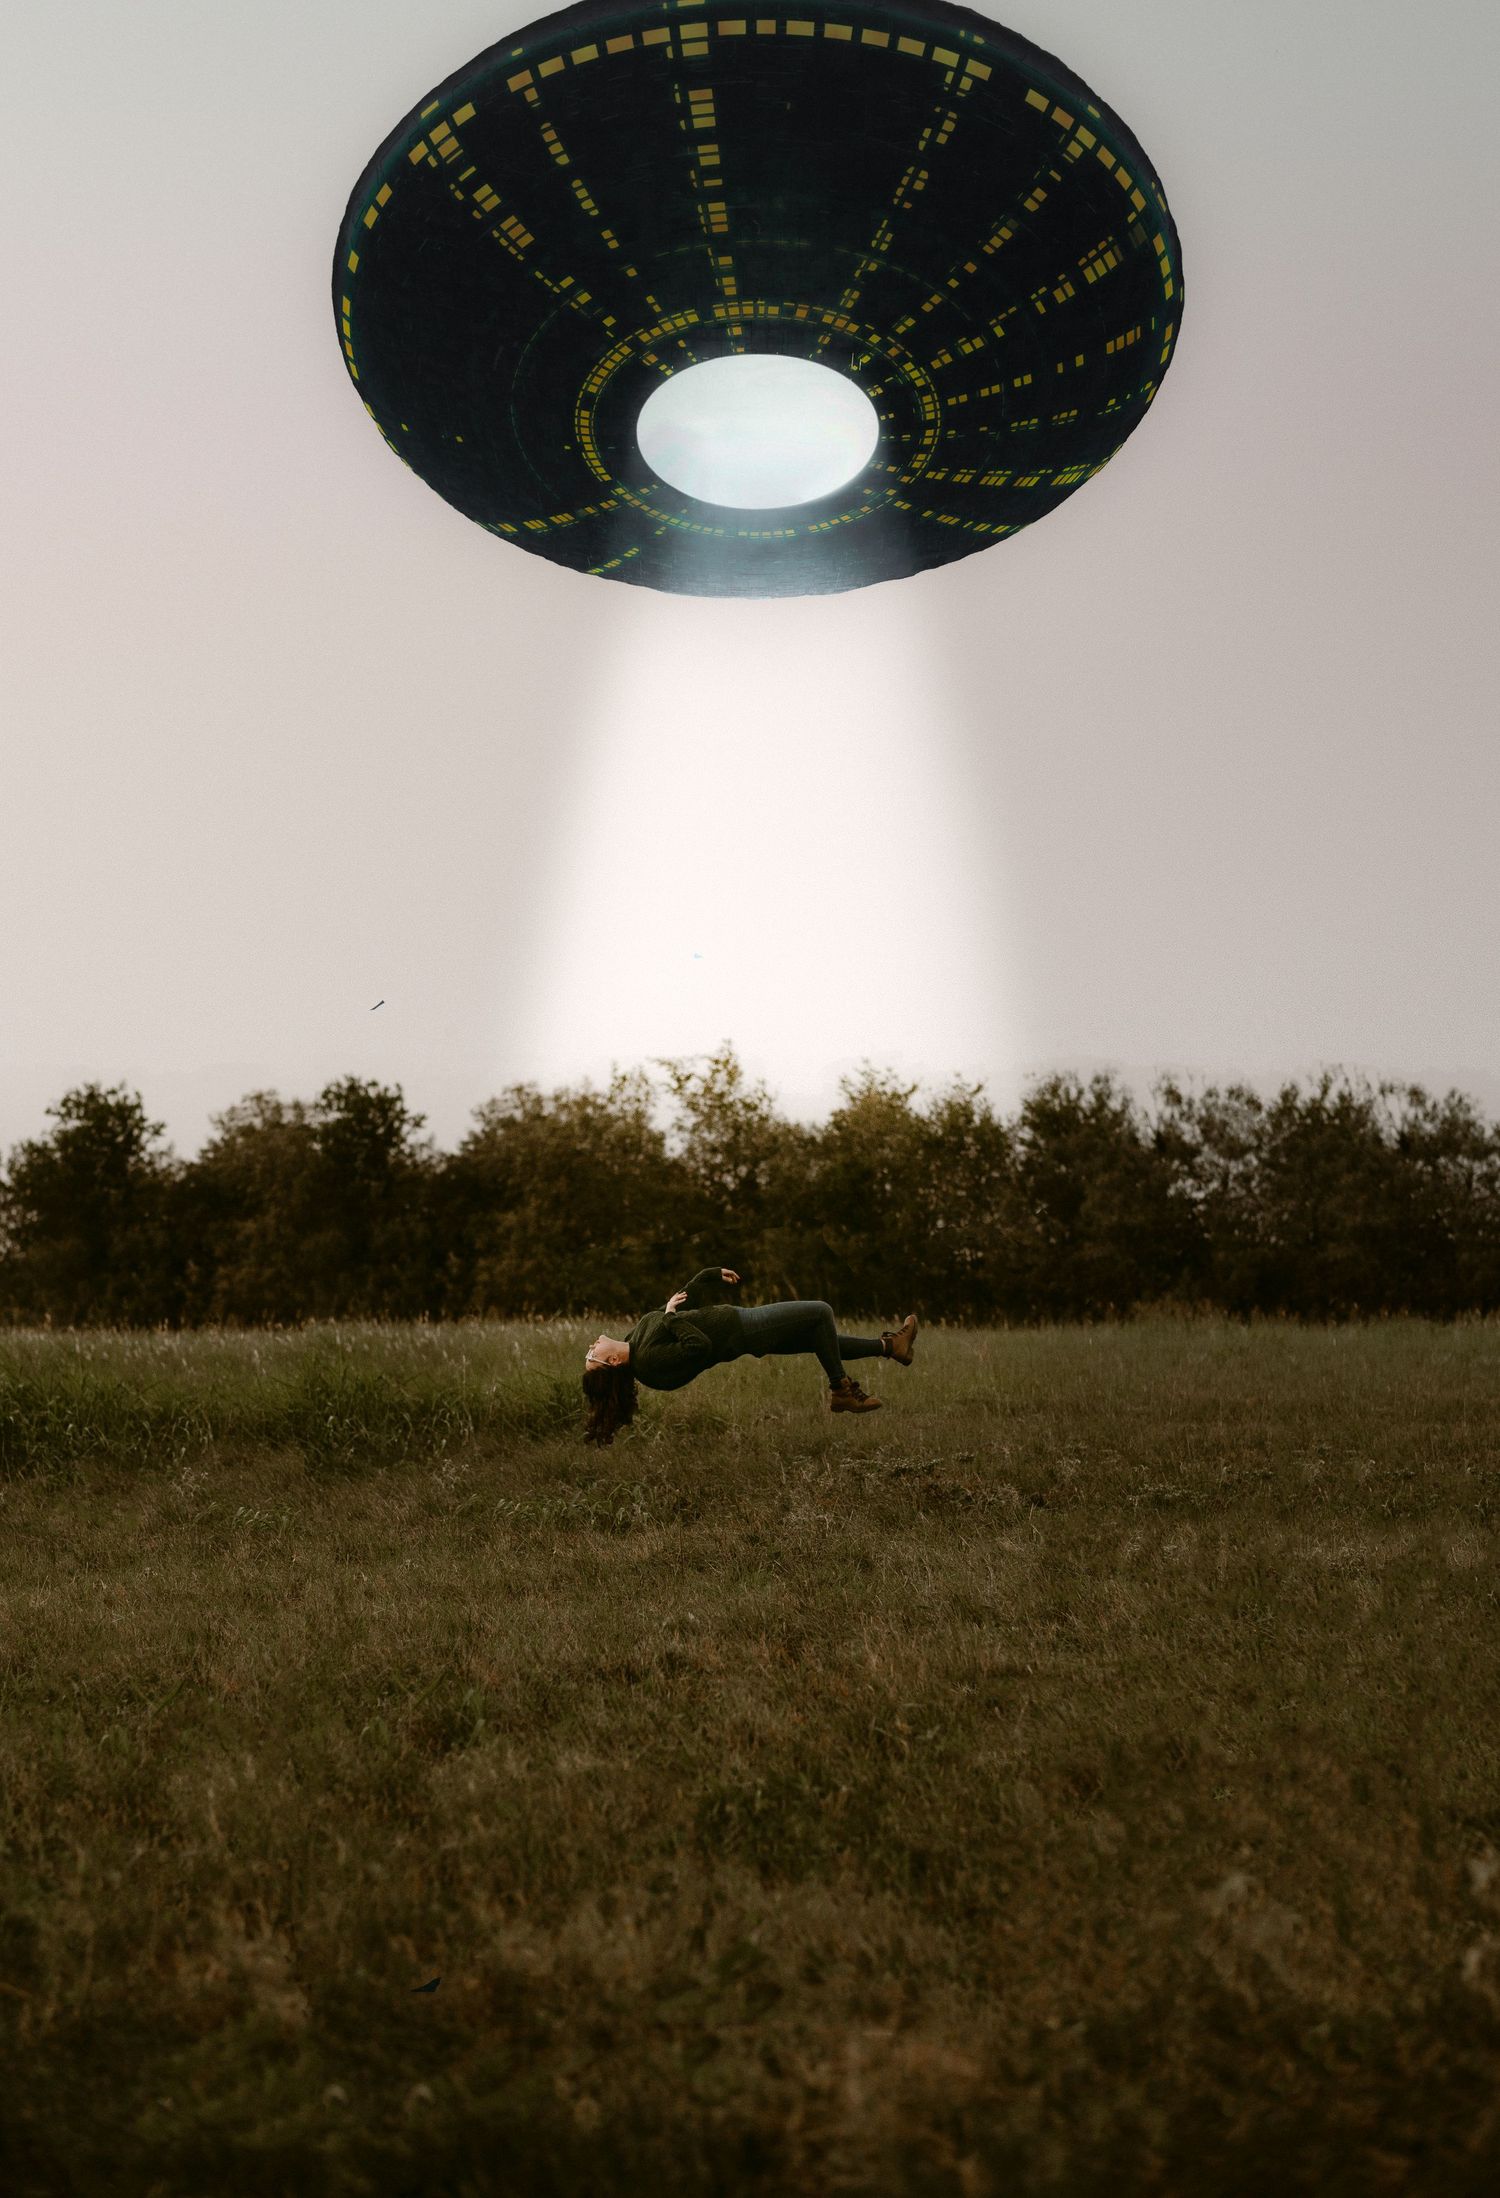
Here's a Quick Tutorial on One of My FAVORITE Spooky Self Portraits

From This to That in About 10 Minutes
Let's Get Started! You'll need to have some prior knowledge of using Adobe Photoshop and a camera but it's all very simple once you get the hang of it!
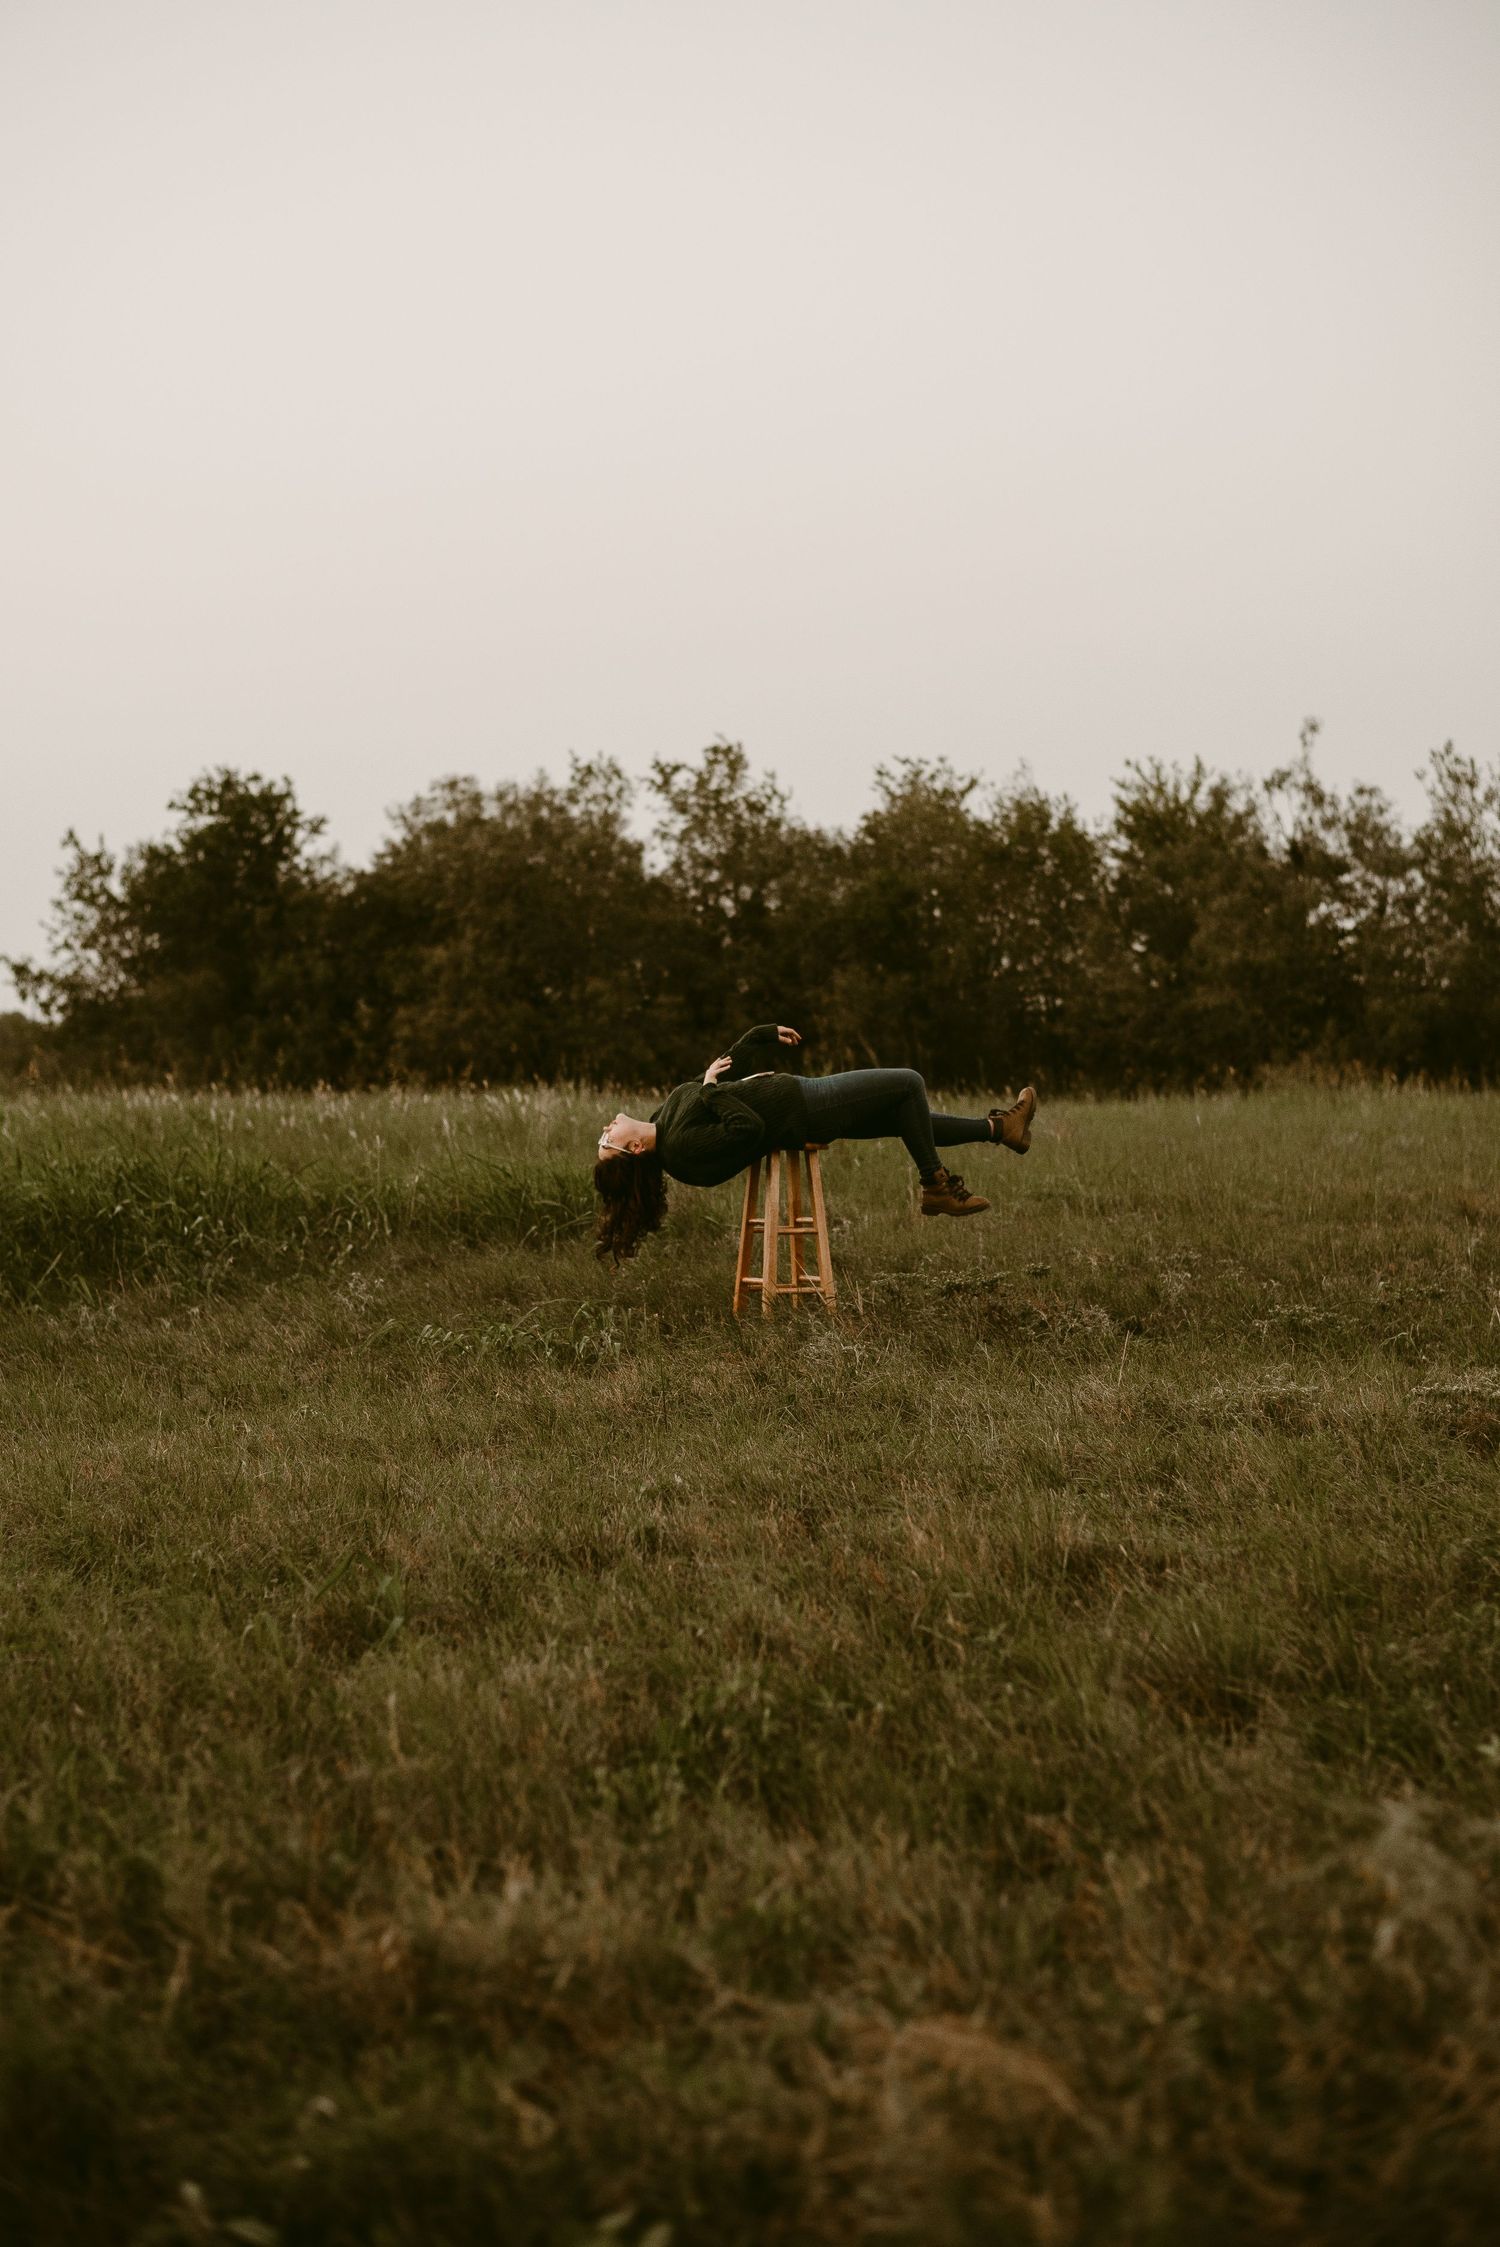
First you have to go out and take some self portraits or you can have a friend shoot the original image for you. I used my tripod and took them myself. I loaded up my wooden stool prop and headed to an open spot with nothing in the background to make editing the final image easier. You could also go for a crowded city or really just anywhere you are to give the effect of being abducted mid normal life activities. If you are new to photography or using Photoshop I definitely recommend going with the open field though.
You'll take your stool, chair, etc. out to a spot then set up your tripod with your camera focused at the top of the chair. You'll lay down and balance on top and lift your legs and arms up. It's actually quite difficult to look weightless while balancing and holding this position so be very careful. If you want to do this with a child you could likely just hold them up and remove the person the same way I'll explain removal of the stool when editing. Once you have a few shots where you are "floating" you will remove the stool and take a photo of the empty field from the same place you took your self portrait.
Now that you have your base photos to work with you'll bring the images into your chosen color correcting and editing software. I use Adobe Lightroom, it's included in the Photography Plan Adobe offers for $10 that also has Photoshop which we need later on in this tutorial. I edit the images using my own presets to be a bit moody to help set the tone of the image. The first image is with my base edit applied only. I started by lowering the exposure until it was underexposed making it appear darker than it actually was outside. I then adjusted the temperature pulling towards the blue to cool the image down just a tad - this will vary deepening on your preference and what temperature your base image is starting at. Once I was okay with the coloring, I copied the settings and pasted them onto the image I took after removing my stool. You can now export your images.
Open both your images up in Photoshop. You now need to jump on your computer and search google for a stock image site and find a UFO Alien Spaceship that fits the vibe of your background image. It took me longer searching the site for an image than the actual editing process. You do have to pay for stock images, this is the most ethical and legal way to add to your composite images when you can't create the image yourself. This UFO stock image was only about $5 which is very fair in my opinion. Once you find and purchase your stock image (or if you're a better artist than I and can create your own) bring this image into Photoshop also.
Once you have your self portrait, plain background and stock image you are ready to start the Composite image that will be your final product. Your base image will be the plain background image.
You'll start by going to the self portrait image. Choose the rectangular marquee tool and select the entire image. Right click on the selected image and choose Layer Via Copy. You'll now select the layer you just created, in the right bottom panel, and pull the copy to the base image. The image then can be perfectly aligned with this base image.
Now you will select the eraser tool and begin removing the stool you laid on top of. If you shot the photos in the same position and place, it should be a perfect replica of what was there that the stool covered. You can zoom in and change your eraser size to properly remove it. Once you are happy with how the image looks you can select the layers panel and right click choosing merge visible.
You'll now Copy and bring your UFO stock image in the same way you did your self portrait image. I choose to put mine at the top and cut off part of it because it looked more realistic this way. You can play around adjusting size, position, etc. until you like how it looks. Once I liked the size and where I placed the image I merged it with the bottom photo.
Now you'll add the light coming from the UFO that is bringing you up to them. To do this you'll select the Dodge tool. I adjusted my brush size to 1500 and set it at 65% to start. I did straight sweeping motions down from the center over my self portrait and repeated this doing it down and around me until I liked how much light there was. As you do it you can lower the percentage to 50% or less even. This will depend on how dark the original is and how bright you want it.
Next I decided to expand my image background by using the crop tool set to content-aware to make the image longer and wider. This added a creepy feel that to me seems like I'm higher off the ground and in a larger more heavily forested area. Once I was happy with the background size I merged visible again. Then I used the Burn tool set to 15% and very large to slightly darken the top of the image so it looked even more like the night sky. I then used the Dodge tool and made it extra tiny on 100% to add a few scattered stars to the night sky. Once I was happy I merged visible and saved as a JPG. You're now Done!
*NOTE* I didn't follow these instructions 100% when I originally made this and just removed the chair by hand which you can see left pixels of it behind. I created this tutorial with a better option but what I did does work if you don't have that background image. You will just edit your self portrait and pull the image into Photoshop making this your base image. You'll use the lasso tool to remove as much of the stool as possible by right clicking and selecting content-aware fill. You will then select the grassy areas around you for the content aware fill example. Once you finalize the content aware fill you'll go in with the clone tool and heal tool to make it look as natural as possible. You'll then follow the steps as above to finalize your edit.


